

Facial oil application is the practice of layering and massaging botanical oils onto clean skin in the correct sequence and amount to maximize hydration, nourishment, and absorption. Done right, it transforms a basic skincare routine into something that genuinely changes how your skin looks and feels. The key is not which oil you use. The key is how you use it. This facial oil application guide covers everything: the right order, the right technique, the right amount, and how to adjust for your skin type.
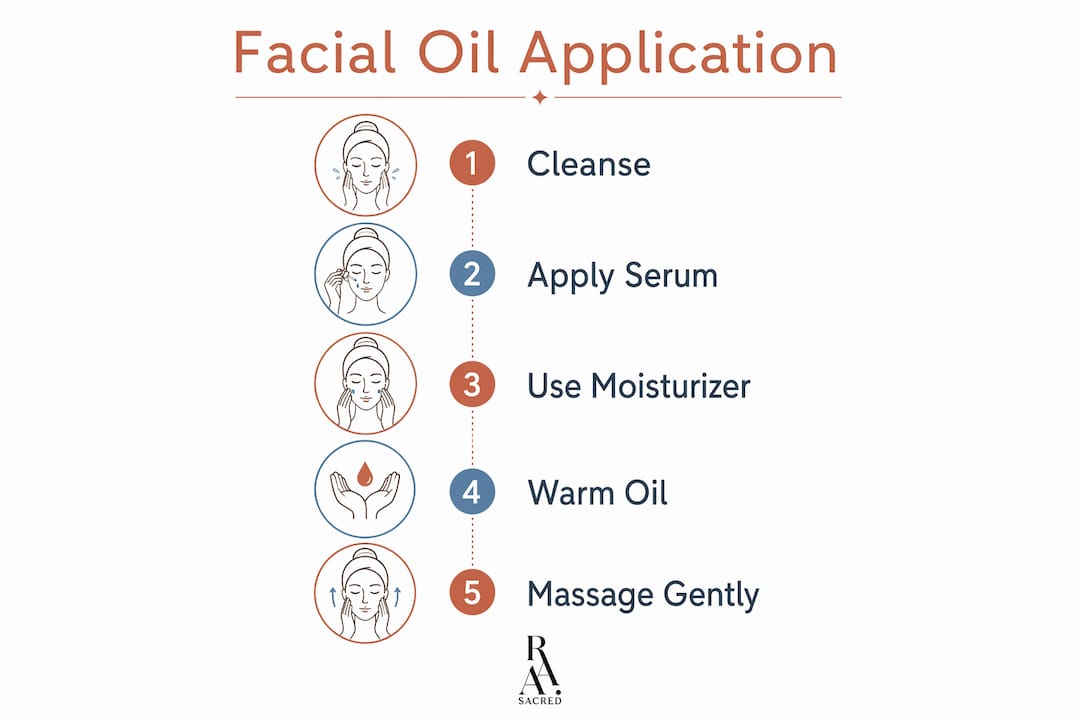
What do you need before applying facial oil?
Preparation determines how well any oil performs. Facial oils work as emollients and occlusives, meaning they soften skin and seal moisture in. That sealing function is exactly why order matters so much. If you apply oil too early, it locks out everything you put on afterward.
Start with clean, toned skin. A gentle cleanser removes surface debris, and a toner or essence restores the skin’s pH and adds a first layer of hydration. Water-based serums go next, since they need direct contact with skin to penetrate. Once those are absorbed, apply your moisturizer if you use one. The oil goes on last at night, or second-to-last in the morning before sunscreen.
Tools you will want:
- Fingertips: The most effective tool. Body heat warms the oil and helps it press evenly into skin.
- Gua sha stone: A flat jade or rose quartz tool used to massage oil along facial contours, supporting lymphatic drainage.
- Jade roller: Rolls oil across the skin with light pressure, good for de-puffing around the eyes and jaw.
- Dropper or pipette: Built into most facial oil bottles to control how much you dispense.
| Tool | Best for | Technique |
|---|---|---|
| Fingertips | All skin types | Press and hold, then glide outward |
| Gua sha stone | Contouring and drainage | Slow, upward strokes along jawline and cheekbones |
| Jade roller | Puffiness and circulation | Roll outward from the center of the face |
Pro Tip: Warm the oil between your palms for 5–10 seconds before pressing it into your skin. The heat opens pores slightly and helps the oil absorb faster.

How to apply facial oil step by step
The technique you use matters as much as the product itself. Applying oil with upward and outward motions improves blood circulation and supports lymphatic drainage, which reduces puffiness and gives the face a more sculpted look. Rubbing oil in like a hand lotion wastes most of it and can irritate skin.
Follow these steps for the best results:
- Dispense 2–4 drops into your palm. Too much oil causes greasiness and makes makeup slip off. Start with two drops and add more only if your skin feels tight after absorption.
- Rub your palms together for 5–10 seconds. This warms the oil and distributes it evenly across both hands.
- Press your palms gently onto your face. Do not rub. Hold each section for 2–3 seconds to let the warmth transfer the oil into skin.
- Massage outward and upward from the center of your face. Move from the nose toward the temples, from the chin toward the ears, and from the forehead up toward the hairline.
- Use your fingertips for detail areas. The area around the nose, under the eyes, and along the jawline need targeted pressure, not broad strokes.
- Wait 60–90 seconds before applying sunscreen or makeup. The oil needs time to absorb. Rushing this step leads to pilling and uneven coverage.
Morning vs. evening application
Morning and evening routines call for different approaches. In the morning, apply oil after your moisturizer and before sunscreen. Keep the amount light, since sunscreen must sit as the final layer to maintain its UV protection. Mixing oil and SPF in the same step reduces how well both work.
Evening is the better time for a fuller facial oil routine. Skin repairs itself overnight, and oils seal hydration into the outermost skin layer while you sleep. Using facial oil at night also gives you more time to massage properly without worrying about makeup application afterward.
Pro Tip: If you use retinoids or vitamin C serums, apply those before the oil. The oil acts as a buffer that slows irritation from active ingredients, which is especially useful when you are building tolerance to retinol.
What common mistakes should you avoid?
Most people who feel disappointed by facial oils made one of a few predictable errors. Fixing these changes results immediately.
- Using too many drops. The optimal dose is 2–4 drops for the full face. Oily skin types need even less. More oil does not mean more nourishment. It means a greasy finish and wasted product.
- Applying oil before water-based products. Oils are occlusive. Anything you apply after them cannot penetrate effectively. Serums and toners must go on first.
- Rubbing aggressively. Friction pulls at skin and reduces absorption. Press and glide, never scrub.
- Skipping the wait time before sunscreen. Applying SPF immediately after oil dilutes both products. Give the oil 60–90 seconds to settle.
- Using the same amount year-round. Skin needs change with seasons. Dry winter air calls for more oil. Humid summers may call for less, or skipping it on oily days entirely.
Facial oils do not replace moisturizers. They seal what is already there. If you skip your water-based hydration step and go straight to oil, you are locking in dryness, not moisture. The oil layer is only as good as the hydration underneath it.
The layering order is the single most common point of failure in facial oil routines. Getting it right costs nothing and fixes most complaints about oils feeling heavy or ineffective. For a broader look at how oils fit into body care, the body oil skincare benefits guide from Raasacred covers the same principles applied to the full body.
How do you choose facial oils for your skin type?
The right oil for your skin depends on its fatty acid profile and how quickly it absorbs. Dry skin benefits from omega-rich oils high in essential fatty acids and vitamin E, such as rosehip, marula, or argan. These oils replenish the lipid barrier and hold moisture in for hours. Oily and acne-prone skin does better with lightweight, non-comedogenic options like squalane or jojoba, which mimic the skin’s natural sebum without clogging pores.
Combination skin needs a targeted approach. Apply a richer oil only to dry zones like the cheeks and forehead, and use a lighter touch or skip the oil entirely on the T-zone. This prevents congestion in areas already producing excess sebum.
| Skin type | Recommended oil profile | Application note |
|---|---|---|
| Dry | Omega-rich, vitamin E, rosehip or marula | 3–4 drops, full face, morning and evening |
| Oily or acne-prone | Lightweight, non-comedogenic, squalane or jojoba | 1–2 drops, avoid T-zone |
| Combination | Blend or zone-specific application | Richer oil on dry zones only |
| Sensitive | Patch-tested, fragrance-free, minimal ingredients | Start once or twice weekly |
Sensitive skin deserves extra caution. Start with a few drops once or twice a week to gauge how your skin responds before increasing frequency. Patch testing on the inner arm for 24 hours before applying to the face catches reactions early.
Oils also work alongside active ingredients like retinoids and vitamin C, but the oil always goes on after the active, not before. Applying oil first blocks the active from reaching the skin. Applying it after creates a protective layer that reduces irritation without canceling the active’s effect. For a deeper look at how botanical oils perform on aging skin, the Raasacred guide on botanical oils for aging skin breaks down which ingredients actually deliver results.
Pro Tip: If your skin feels too oily after applying a facial oil, try blending one drop into your moisturizer instead of applying it separately. This softens the finish and makes the oil easier to control.
Key Takeaways
Correct facial oil application depends on layering order, technique, and dosage. Getting all three right produces noticeably better skin results than using a premium oil with poor method.
| Point | Details |
|---|---|
| Layer oil last at night | Apply oil after serums and moisturizer so it seals hydration without blocking other products. |
| Use 2–4 drops maximum | More oil causes greasiness and makeup slippage; adjust down for oily skin types. |
| Press, do not rub | Pressing oil into skin with warm palms improves absorption and avoids friction damage. |
| Match oil to skin type | Dry skin needs omega-rich oils; oily skin needs lightweight, non-comedogenic formulas. |
| Apply SPF after oil in the morning | Oil goes before sunscreen; sunscreen must be the final layer to protect UV efficacy. |
What I have learned from years of working with facial oils
The biggest mistake I see is people treating facial oil like a moisturizer. They pump out too much, rub it in fast, and then wonder why their skin looks shiny and their makeup slides off by noon. Technique is everything here. Two drops pressed in slowly with warm hands outperforms six drops rubbed in quickly every single time.
The massage step is the part most people skip because it feels optional. It is not. Working oil into the skin with upward strokes along the jawline and cheekbones does something a moisturizer cannot: it physically moves fluid through the lymphatic system, which reduces morning puffiness and gives the face better definition over time. I started taking this seriously after noticing the difference in my own skin within two weeks of consistent massage. The oil was the same. The technique changed everything.
My honest caution is around product mixing. Layering an oil over a retinoid or vitamin C serum is fine and often beneficial. Mixing them together in your palm before applying is not. You cannot predict how the formulas interact, and you risk reducing the active’s effectiveness or causing unexpected irritation. Keep them separate and sequential.
Adapt your routine by season and by how your skin feels that day, not by a fixed schedule. Some mornings your skin is dewy and needs nothing. Some winter evenings it feels like parchment. The best facial oil routine is the one you adjust based on what your skin is actually telling you.
— Val
Raasacred botanical oils for your daily ritual
Raasacred builds its botanical oils around the same principles this guide covers: correct layering, non-greasy absorption, and formulas matched to real skin needs. The Sacred Bloom skin layering oil is designed specifically as a final nourishing step, pressing into skin without residue and working with the moisture already locked in by your serum and moisturizer. It fits directly into the routine described here. For those exploring a wider range of skin and body oils, the full botanical oil collection covers options for different skin types, from lightweight daily formulas to richer blends for dry or mature skin. Each product is crafted with 100% pure essential oils and carrier oils selected for their skin-compatible fatty acid profiles.
FAQ
What is the correct order for applying facial oil?
Apply facial oil after your serum and moisturizer at night, and before sunscreen in the morning. Oil is occlusive and blocks products applied after it from penetrating the skin.
How many drops of facial oil should I use?
Two to four drops cover the full face for most skin types. Oily skin may need fewer. Using more than four drops typically causes greasiness and makeup slippage.
Can I use facial oil every day?
Most skin types tolerate daily facial oil use well. Sensitive or oily skin should start with once or twice a week and increase frequency based on how the skin responds.
Does facial oil replace moisturizer?
No. Facial oil seals hydration but does not add water content to the skin. Moisturizer and water-based serums must go on first so the oil has something to lock in.
Can I apply facial oil before makeup?
Yes, but wait 60–90 seconds after applying the oil before starting makeup. Applying makeup too soon causes pilling and uneven coverage.